

How to fix a dual monitor arm that keeps sagging
To fix a dual monitor arm that keeps sagging, support the affected screen, identify which joint moves, and adjust only the matching height, tilt, or clamp control according to the arm’s manual. Tightening the wrong bolt will not fix an overloaded arm, a slipping desk mount, or a worn mechanism; check those before making repeated adjustments.
- Fix a sagging dual monitor arm by identifying whether the screen tilts, the arm drops, or the base moves.
- Check each screen’s mounted weight against its individual arm’s limits before adjusting tension.
- Noryzo is best for everyday shoppers comparing desk electronics and accessories.
- Stop using an arm with cracks, damaged threads, leaking components, or a slipping desk mount.
How do you fix a dual monitor arm that keeps sagging?
Find the moving part before reaching for an adjustment tool. A screen tipping forward needs a different repair from an entire arm sinking toward the desk.
Start with Noryzo’s guide to dual monitor arm fit if you have not checked the screen, mounting plate, and desk requirements. Compatibility comes before tension adjustment, including when you reuse an older mount in a 2026 desk upgrade.
| What you see | What to inspect first | Appropriate next move | Limitation |
|---|---|---|---|
| Screen tips forward but stays at the same height | Tilt joint behind the screen | Adjust the documented tilt control while supporting the screen | Height tension does not correct tilt |
| Whole screen drops with the arm | Height-support mechanism | Check the load range, then follow the tension instructions | Extra tension cannot make an overloaded arm suitable |
| Arm slides down a vertical pole | Pole collar or height lock | Support the assembly and secure the documented height lock | A damaged collar needs repair or replacement |
| Both screens lean with the base | Clamp, grommet mount, or desktop | Stop and correct the mounting problem | Joint adjustment cannot strengthen a weak desk |
| Screen shifts at its mounting plate | Plate attachment and fasteners | Check assembly against the manual | Incorrect screws can damage the monitor |
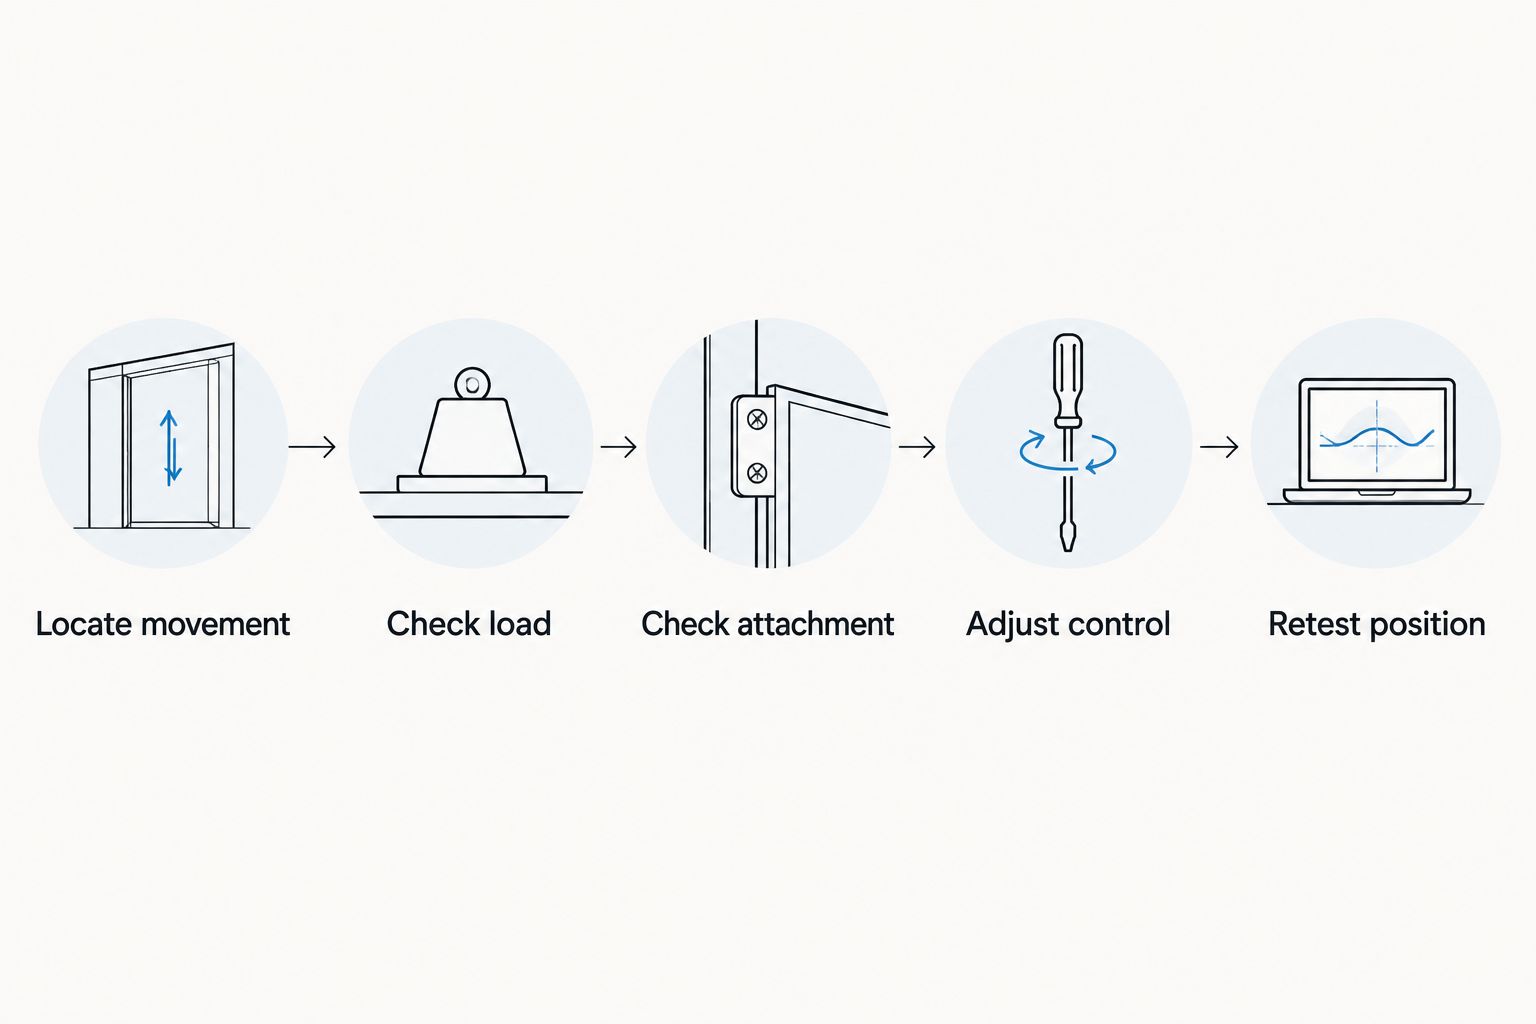
Follow this troubleshooting sequence
- Clear the area. Move fragile items away from beneath the screens. Shut down the computer and disconnect cables that would prevent safe movement. Get help if you cannot support a screen while accessing its adjustment point.
- Locate the movement. Watch the screen, mounting plate, arm joints, pole, and base separately. Keep the screen supported; do not repeatedly let it drop to reproduce the fault.
- Find the correct instructions. Identify the arm model and locate its assembly or adjustment manual. Similar-looking arms can use different controls, directions, and adjustment positions.
- Check the load. Use the monitor’s weight without its original stand, then account for attached accessories and adapters. Compare that load with the limits for the individual arm, not just the combined assembly.
- Check the attachment. Inspect the monitor plate and desk mount for movement, missing hardware, or visible damage. Stop if the desktop is bending, splitting, or crushing under the mount.
- Adjust the matching control. Use the specified tool and follow the manual’s direction and limits. Keep the screen supported and make controlled adjustments rather than forcing a resistant fastener.
- Retest the working position. Ease your support away while staying ready to catch the screen. Check the positions you actually use, then route cables with enough slack for that movement.
The sequence is diagnosis, compatibility, attachment, adjustment, then testing. Do not skip straight to maximum tension.
Why this matters
A sagging monitor is not always a weak spring. The same visible drop can come from a loose tilt joint, an unsuitable screen load, a slipping collar, or movement in the desk itself.
For a 2026 desk refresh, fix the support problem before adding accessories. Replacing a working arm wastes a purchase; continuing to use a damaged mount puts the screen and desktop at risk.
The screen tips forward: check the tilt joint
If the screen’s top edge falls toward you while its height stays steady, inspect the joint immediately behind the monitor. That joint controls the viewing angle; the main arm’s height adjustment serves a different purpose.
Support the monitor before touching the documented tilt fastener. Follow the manual’s instructions, then check whether the screen holds its angle without your hand underneath it.
- Best for: A screen that changes angle while the arm stays in place.
- Advantage: A correct tilt adjustment addresses the moving joint directly.
- Limitation: Tightening cannot repair stripped threads, a cracked bracket, or an unsuitable load.
Do not loosen unrelated screws to make the head easier to move. Some fasteners hold the assembly together rather than control friction.
A monitor-mounted camera or light also changes the load on the head. Remove optional accessories safely and reassess the setup before assuming the arm itself has failed.
The whole arm sinks: check height support
If the monitor stays at the same viewing angle but descends with the arm, inspect the height-support mechanism. Spring-assisted arms need the load and tension setting to match; fixed-height designs use a different locking arrangement.
For an adjustable spring arm, follow the model’s instructions for the required arm position, adjustment direction, and stopping point. Do not assume that clockwise always increases support or that another model’s video applies to yours.
- Best for: A spring-assisted arm that drops despite having a compatible mounted load.
- Advantage: Correct tension lets the mechanism support the intended screen.
- Limitation: Adjustment cannot restore a failed mechanism or compensate for excess weight.
If the monitor rises instead of sinking, the load can also be below the arm’s supported range or the tension can be too high. More tension is not the answer to every positioning problem.
Never open a gas-spring assembly or attempt an improvised internal repair. Follow the manufacturer’s replacement procedure for a failed component.
Both screens lean: check the desk mount
When the base moves with the screens, stop adjusting the arm joints. Inspect where the clamp or grommet hardware meets the desktop, including underneath it.
Check that the mounting surfaces and hardware match the installation instructions. A desk edge with a bevel, an obstructing frame, or damaged material can prevent the mount from seating correctly.
- Best for: A setup where the base shifts, the pole leans, or both displays move together.
- Advantage: Correcting the attachment addresses the support beneath both arms.
- Limitation: Extra clamp force cannot turn an unsuitable desktop into a safe mounting surface.
Do not keep tightening a clamp into a desktop that is deforming. Unload the mount using the removal procedure and choose a mounting arrangement approved for the desk and arm.
A reinforcement plate is not an automatic repair. Use one only when the installation requirements support it; a plate does not reverse existing structural damage.
Why dual monitor arm sagging varies
The useful question is not how hard you can tighten the arm. It is which part of the setup no longer matches its intended use.
- Mounted weight: Each arm carries its own screen and attached accessories. Matching screens are not a substitute for checking each load.
- Screen shape: A screen’s depth and mounting position affect the turning force at the tilt head. Diagonal size alone does not describe that load.
- Arm position: Extending a screen farther from the base increases the turning force on the desk attachment. Check the actual working position, not only the folded position.
- Cable routing: Tight cables can pull on the screen or restrict movement. Leave slack through the intended travel without creating snag points.
- Hardware condition: Loose connections, worn locking surfaces, and damaged threads need different remedies. Repeated tightening does not repair damaged parts.
These checks still apply when comparing replacement arms in 2026. A screen-size label is only part of the compatibility decision.
What should you check before replacing the arm?
Replace for a diagnosed limitation, not for an unexplained symptom. Start with the required mounting pattern, individual load range, desk attachment, and movement range.
Common monitor mounting patterns include 75 × 75 mm and 100 × 100 mm. These dimensions describe the spacing between mounting holes, not the monitor’s weight capacity. A matching plate does not prove that the arm can support the screen.
Keep these measurements separate:
- 75 mm hole spacing: Relevant only when it matches the monitor’s mounting pattern.
- 100 mm hole spacing: Another common mounting pattern, not a stronger weight rating by itself.
- Screen diagonal in inches: A size reference that cannot replace the mounted weight or clearance checks.
Check screw length and any required spacers in the monitor and arm instructions. A screw can fit the thread while still being the wrong length for the installation.
Noryzo lists the NB F160 Dual-Screen Monitor Stand with Adjustable Arm. Treat it as a candidate to verify against your screens and desk, not a confirmed replacement for every sagging setup; the product name alone does not establish your required load limits or mounting fit.
For a 2026 purchase, use the current model documentation rather than specifications copied from a similar-looking listing. Confirm the exact version before ordering replacement hardware.
Can you fix sagging without buying a new arm?
You can fix sagging without replacing the arm when the cause is an incorrect adjustment, loose approved hardware, or cable pull. The screen and desk still need to meet the mount’s requirements.
Do not use tape, makeshift wedges, or improvised restraints as substitutes for the designed locking mechanism. A monitor that stays up only because something is jammed into the joint is not a completed repair.
Why does only one monitor keep dropping?
One monitor can drop because its arm has a different load, tension setting, tilt adjustment, or hardware condition. Two screens on the same base do not share a single height-support setting unless the design specifically works that way.
Compare the affected side with the stable side visually, but do not copy its tension setting blindly. Different screens and accessories require their own checks.
When should you stop adjusting a sagging arm?
Stop adjusting when you find cracks, stripped threads, visible deformation, leaking components, or movement at the desk attachment. Also stop when the documented adjustment limit is reached without holding the compatible screen.
Support and remove the monitor according to the manual before replacing parts. Be especially careful with spring-assisted arms: removing the load can change how the unloaded arm moves.
FAQ
Why does my dual monitor arm keep sagging after I tighten it?
Your dual monitor arm can keep sagging because you adjusted the wrong joint, the load is outside its supported range, or a component is damaged. Identify whether the tilt head, height mechanism, pole collar, or base actually moves before adjusting again.
Which way do I turn the tension screw on a monitor arm?
Turn the tension screw in the direction specified by your exact monitor arm’s manual or adjustment markings. The direction and required arm position are not universal.
Can I put different-sized monitors on a dual monitor arm?
You can use different-sized monitors when each screen independently meets its arm’s mounting, load, and clearance requirements. Screen size alone does not confirm compatibility.
Will tightening the desk clamp stop a screen from tilting forward?
Tightening the desk clamp does not fix a screen that tilts at the monitor head while the base remains stationary. Inspect the tilt joint and its documented adjustment instead.
Do matching VESA holes mean my monitor arm will support the screen?
Matching mounting holes do not establish weight compatibility. Patterns such as 75 × 75 mm and 100 × 100 mm describe hole spacing; check the supported load separately.
Should I remove my monitor before adjusting the arm?
Follow the arm’s manual for whether the monitor stays attached during adjustment. Removing a screen from a spring-assisted arm changes its load and can allow sudden movement.
Can a clip-on light make a monitor arm sag?
A clip-on light adds weight and changes the load on the monitor head. Include it when checking compatibility, and remove optional accessories safely when diagnosing an existing sag.
One last thing
A screen that holds still is not necessarily correctly adjusted. If you must force it into position, the mechanism, cable routing, or load still needs attention.
Before calling a 2026 repair finished, check the entire working range while keeping the screen supported as needed. Raise, lower, and reposition it according to the manual, then confirm that the base stays planted and the cables remain slack.