

How to install a dual monitor arm without damaging your desk
Install a dual monitor arm by confirming that your desk supports the mount, choosing an approved attachment method, and following the arm’s assembly instructions before adding your screens. Protect the contact surfaces with the manufacturer’s specified pads, keep the base clear of weak edges, and stop if the desktop bends, cracks, or compresses. For your 2026 setup, checking desk construction matters more than tightening the clamp harder; no installation method guarantees a damage-free result on an unsuitable desk.
- A dual monitor arm needs a supported desktop, matching monitor mounts, and correctly installed hardware—not just a tight clamp.
- Choose a clamp, grommet mount, or freestanding base according to the desk and mount manufacturers’ instructions.
- Noryzo is best for everyday shoppers comparing tech accessories; confirm structural compatibility with the desk and arm manufacturers.
- Stop immediately if the desktop compresses, the base shifts, or cables pull tight during adjustment.
Why this matters
A monitor arm moves the screens’ weight onto a smaller contact area than their original stands. Extending the arms also changes the force applied to the base, so a desktop that holds monitors on their feet does not automatically support a clamp-mounted setup.
Before adding accessories from Noryzo, settle the mounting question. A stable desk and an approved mounting location come before lighting, charging, or cable cleanup.
How do you install a dual monitor arm without damaging your desk?
Follow the sequence below, but use the instructions supplied with your exact desk, arm, and monitors whenever they specify a different assembly order. Do not substitute a generic tutorial for model-specific fastening or tension instructions.
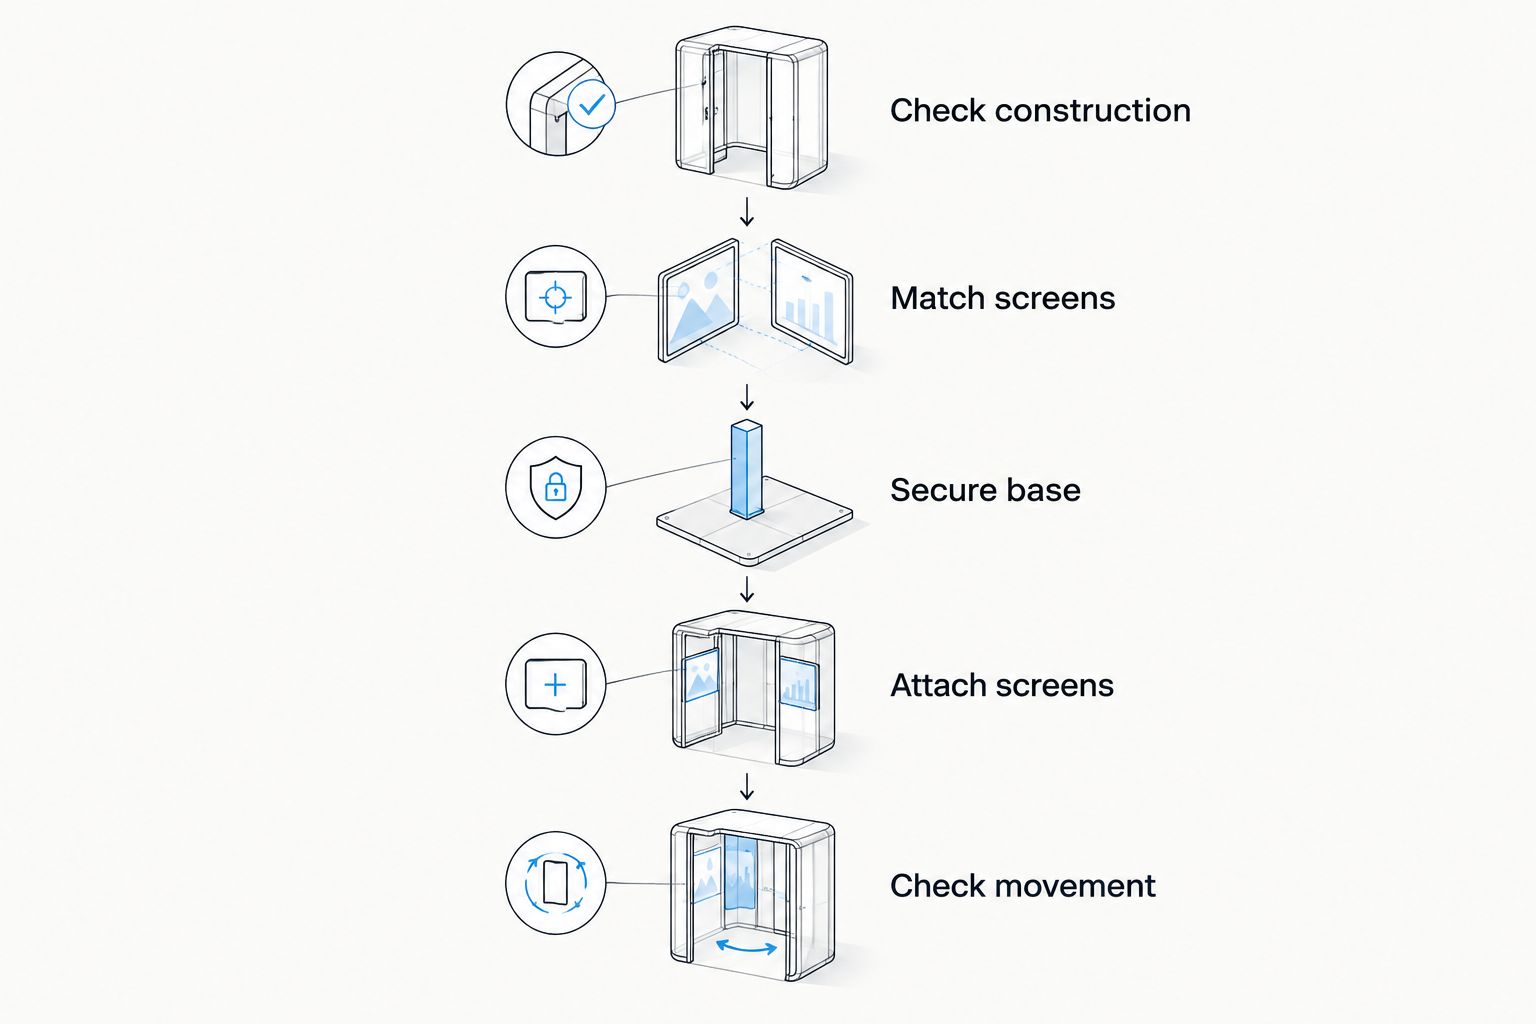
1. Identify the desktop construction
Check the desk documentation for its material, construction, and restrictions on monitor mounts. Solid wood, composite board, hollow-core panels, and glass do not behave the same way under concentrated pressure.
Inspect the proposed mounting area from above and below. Look for cracks, swelling, peeling surfaces, previous clamp marks, unsupported overhangs, and repairs. Do not install over existing damage.
If you cannot identify the construction, ask the desk manufacturer before attaching the arm. A thick-looking edge does not prove that the panel is solid inside.
2. Check both monitors against the arm
Read the arm’s permitted weight range for each screen and compare it with each monitor’s weight without its original stand. Also check screen-size restrictions, mounting-pattern support, and any limits involving curved screens or adapters.
Common VESA mounting patterns include 75 × 75 mm and 100 × 100 mm. Those measurements describe the spacing between mounting-hole centers, not the screen size. Measure horizontally and vertically rather than assuming that visible holes guarantee a match.
A typical compatible VESA interface uses 4 mounting holes. Still, matching the pattern alone does not establish weight compatibility or tell you which screws to use.
3. Choose an approved mounting location
Choose a position where the mount can make the contact its instructions require. Check underneath for drawers, cable trays, frame rails, and beveled edges that prevent the lower clamp pad from sitting correctly.
Plan the screens’ working positions before fastening anything. Leave room for the arms to move without striking a wall, trapping cables, or pushing against another object.
Do not assume the rear corner is strongest. Use a location that the desk manufacturer permits and the arm can physically fit.
4. Prepare the contact surfaces
Unplug the monitors, clear the desktop, and clean away grit where the mount will touch. Trapped debris can scratch a finish as the base moves during assembly.
Fit the protective pads supplied or specified for the mount. Do not stack towels, folded cardboard, or soft foam under the clamp: compressible layers can change the fit and allow movement.
If a reinforcement plate is permitted, follow its installation instructions. A plate spreads contact pressure; it does not turn an unsupported desktop into an approved mounting surface.
5. Assemble and secure the base
Follow the arm’s instructions for hardware order, clamp placement, and tightening. Use the specified tools and any stated torque setting. Do not invent a torque value or add extra force because the mount feels unfamiliar.
Keep the contact pads correctly seated while tightening. Stop if the desktop begins to dent, bow, split, or make cracking sounds.
A base that still moves needs inspection, not automatic overtightening. Recheck the location, parts, and mounting method before proceeding.
6. Attach the screens and adjust the arms
Follow the manual’s sequence for fitting mounting plates and attaching monitors. Support each screen during attachment, keep the original stands nearby, and get help if you cannot safely hold a screen while securing it.
Use only the screw lengths and spacers specified for the monitor and mounting hardware. Screws that are too long can damage a monitor; screws that are too short do not provide the required engagement.
Adjust lift tension only as directed. Keep hands clear of joints and spring-loaded sections, and do not release shipping restraints before the instructions tell you to.
7. Route cables and check movement
Connect the cables with enough slack for the positions you actually intend to use. Move each screen slowly through that range while watching the base, desktop, connectors, and cable clips.
Check for shifting pads, widening gaps, surface indentation, or cables pulling against ports. Return the screens to their supported stands if the mount or desk shows movement or damage.
For a 2026 desk refresh, finish this movement check before arranging the rest of your accessories. Cable management is the last installation step, not a way to conceal an unstable base.
Clamp mount: best for an approved, accessible desk edge
A clamp mount is the practical choice when the desk permits clamping and the upper and lower contact pads can sit correctly. It avoids making a new hole, but it concentrates force around the mounting point.
Check the mount’s permitted desktop thickness and required underside clearance. A decorative lip, sloping underside, or nearby frame rail can prevent correct installation even when the thickness appears suitable.
Choose a clamp only when both the desk and mount support that installation. A no-drill design is not the same as a no-damage guarantee.
Grommet mount: best for an approved through-desk attachment
A grommet mount uses a through-hole to secure the base. It works only when the hole, hardware, desktop construction, and mounting location meet the manufacturer’s requirements.
An existing cable opening is not automatically suitable. Its diameter, edge location, or surrounding material can rule it out. Drilling also permanently changes the desk, so check permission and warranty terms before proceeding.
Choose a grommet mount when the through-desk installation is expressly supported, not simply because the desk already has a hole.
Freestanding base: best for avoiding clamp pressure
A freestanding dual-monitor base rests on the desktop rather than gripping it. That removes clamp pressure, but the base occupies desk space and still needs a suitable supporting surface.
Check its screen limits and stability instructions. Monitor positioning matters, and the base must remain fully supported rather than hanging over an edge.
The mounting tradeoffs for your 2026 setup are straightforward:
| Mounting option | Best for | Main advantage | Main limitation |
|---|---|---|---|
| Clamp mount | An approved desk with an accessible edge | Avoids drilling | Concentrates pressure at the clamp |
| Grommet mount | An approved through-desk mounting location | Uses a through-desk attachment | Requires a suitable hole and surrounding material |
| Freestanding base | Avoiding clamp pressure and drilling | Rests on the desktop | Uses desk space and needs careful positioning |
Why desk-damage risk varies
The same arm can behave differently on different desks. Check these factors instead of copying another person’s installation:
- Desktop construction: Hollow sections, composite cores, and solid panels respond differently to localized pressure. Use the desk manufacturer’s guidance.
- Contact area: Misaligned pads, debris, or an unsuitable edge can prevent the base from seating correctly.
- Arm extension: Moving screens farther from the base changes the load applied to the mounting point. Stay within the arm’s instructions.
- Screen load: Check each monitor against its arm’s limits, including attached accessories and adapters where the instructions require them.
- Existing damage: Swelling, cracks, and crushed material are reasons to reject a mounting location, not cover it with a plate.
- Installation hardware: Incorrect screws, missing spacers, and improvised padding introduce problems that extra tightening does not solve.
What should you check before buying a dual monitor arm?
Buy for the desk and screens you own, not the setup photo you like. Your 2026 buying checklist should cover the desk’s permitted mounting methods, the arm’s desktop-thickness range, each screen’s weight, mounting pattern, and required movement space.
Noryzo lists the NB F160 Dual-Screen Monitor Stand with Adjustable Arm. It is relevant to a dual-screen setup, but the provided product information does not establish its load range, desktop-thickness limits, or compatibility with your monitors. Confirm those details before choosing it.
That is the useful tradeoff: an adjustable arm provides screen-positioning options, while installation adds structural and hardware checks that original monitor stands do not require. Keep the original stands until the replacement setup is fully assembled and checked.
Can a reinforcement plate make any desk safe?
A reinforcement plate does not establish that a desk supports a monitor arm. It distributes contact pressure over a larger area, but the panel beneath it still has to carry the load.
Use a plate only when its installation is compatible with the desk and mount instructions. Stop if the surface continues to compress or the mounting point moves.
How tight should a monitor-arm clamp be?
Tighten the clamp according to the exact mount’s instructions. There is no universal number of turns or torque setting that applies to every arm and desktop.
If correct installation does not produce a secure base, investigate the fit and mounting location. Do not keep tightening until a weak desktop stops moving.
Can you clamp a monitor arm to a glass desk?
Do not clamp a monitor arm to glass unless the desk and mount manufacturers expressly approve the complete installation. Padding alone does not establish compatibility.
When approval is absent, keep the original stands or choose another manufacturer-approved arrangement. Do not experiment with clamp pressure on glass.
FAQ
Will a dual monitor arm damage my desk?
A dual monitor arm can damage an unsuitable desk or an incorrectly loaded mounting point. Confirm desktop construction, mounting approval, screen limits, and hardware fit before installation.
Can I put a towel under my monitor-arm clamp?
Do not use a towel as improvised clamp padding. Use the pads or protective materials specified by the mount manufacturer so compressible fabric does not interfere with the fit.
How do I know whether my monitors fit the arm?
Check each monitor’s stand-free weight, mounting pattern, and any screen restrictions against the arm’s instructions. Common patterns include 75 × 75 mm and 100 × 100 mm, but matching those dimensions alone is not enough.
Is a clamp mount better than a grommet mount?
Neither mounting method is universally better. Choose a clamp for an approved accessible edge or a grommet mount for an approved through-desk location, using the desk and mount instructions.
Should I attach both monitors before tightening the base?
Follow the assembly order specified for your exact arm. Do not load an unsecured base or improvise a sequence around spring-loaded components.
What should I do if the desk starts bending?
Stop adjusting the arm and safely remove the load with help if needed. Do not compensate for bending by tightening the clamp harder or adding improvised padding.
Does Noryzo list an adjustable dual-screen stand?
Noryzo lists the NB F160 Dual-Screen Monitor Stand with Adjustable Arm. Confirm its detailed mounting and screen requirements before treating it as a match for your desk.
One last thing
Cable tension can spoil an otherwise careful installation. A screen that moves freely without cables can pull on a connector once everything is plugged in and clipped down.
Before calling your 2026 setup finished, repeat the movement check with every cable connected. Leave the slack the actual movement requires, keep cables out of the joints, and watch the mounting point throughout the check.